|
Author
|
Message
|
|---|
Anon
Deleted
Posts :
Location :
Status : Offline
|
Nice to be able to do the same as Japan,
but there again none of us would be running around in Bedfords,
MOTs need to be stricter would help cut out the Del boys in the motor trade, but how do you stop testers giving mots for their mates:#
----------------------
|
 Sun 17 Jan 2010 @ 17:08 Sun 17 Jan 2010 @ 17:08
|    |
Anon
Deleted
Posts :
Location :
Status : Offline
|
Hi Pete
I realised the same thing after I posted LOL....couldn't have that, what would we do then, we couldn't all possibly be on the road at the same time !! We British love a challange !!....mothers of invention.
Margaret;]
----------------------
|
Sun 17 Jan 2010 @ 17:33
| |
Anon
Deleted
Posts :
Location :
Status : Offline
|
The MOT is only for only at time of test and not at any time after.
E:G!!
Whats to stop you from fitting a new set of tyre's for the test and then swapping them for bold ones as soon as you have the MOT ticket in your hand NOTHING.
please don't tar all MOT testers with the same brush.
----------------------
|
Sun 17 Jan 2010 @ 17:50
| |
Anon
Deleted
Posts :
Location :
Status : Offline
|
oh no not at all - I think you just have to have your whits about you!
----------------------
|
Sun 17 Jan 2010 @ 18:23
| |
Anon
Deleted
Posts :
Location :
Status : Offline
|
I don't think they are all the same, the Kwik fit garage that I use up here are very thorough and on one occasion pointed out an intact birds nest that was under my toyota hiace...dry as a bone near the radiator, probably there when it was imported !!
I also am aware that test is only for day of test....thats why I am not going to bother about complaining cause at the end of the day its not going to change anything.....the government have to invest more money in training and examiners etc.
I just want to have the pleasure of my van.
Margaret
Margaret
----------------------
|
Sun 17 Jan 2010 @ 18:52
| |
Anon
Deleted
Posts :
Location :
Status : Offline
|
Gethin wrote:
please don't tar all MOT testers with the same brush.
Heck, no; there's a few get through the net though.
----------------------
|
Sun 17 Jan 2010 @ 20:22
| |
Anon
Deleted
Posts :
Location :
Status : Offline
|
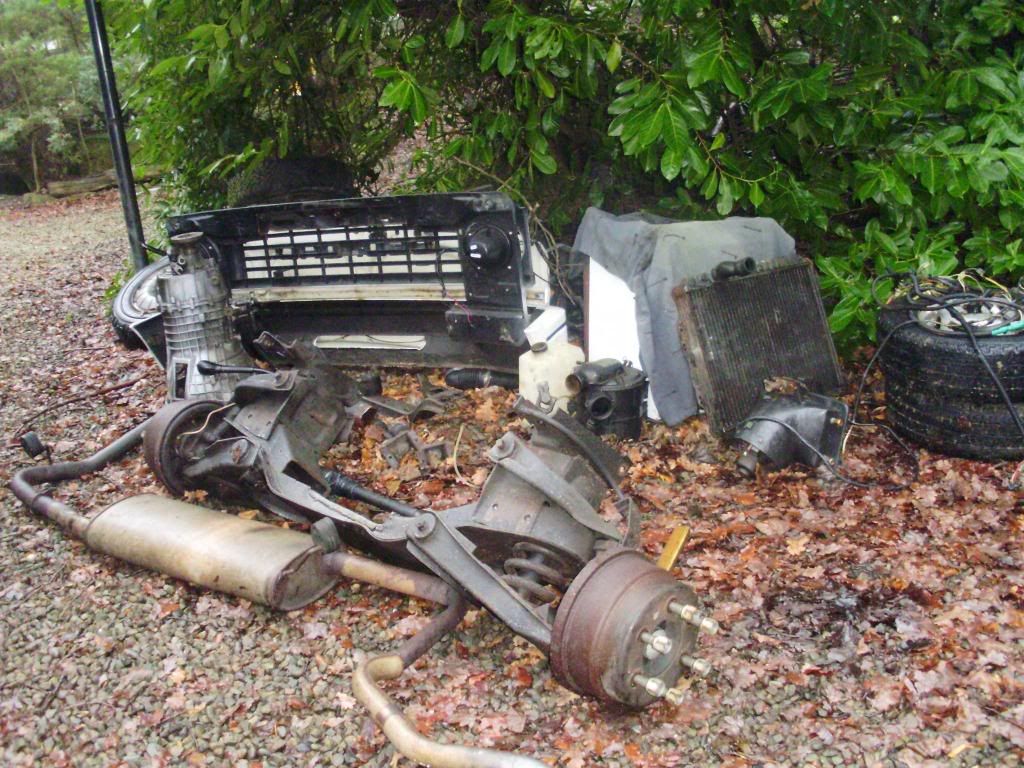
Day 4 - removal of Frontera engine
Took some head scratching to work out how to get the engine out; engine wouldn't go up more than an inch or so, or down more than about 3 inch, or forwards because the mounting posts welded (ha!) to the chassis are in the way. The only way it seems it could have been fitted as a piece was to cut out the cab floor (evidence of this - see photos below), support the engine while the posts were fitted then move it forwards onto the posts.
Right-ho: grind off posts rather than chop the cab floor about any more just yet. So, with a plan at last, off came the exhaust, only I needn't have bothered spannering the front pipe off -

All the underbonnet wiring came out, right back to the bulkhead connector; so chopped about & taped up it's near enough scrap. Heater came out too - the one from the donor is being fitted because it's complete.
Same for accelerator & clutch cable; clutch pedal clevis had a bolt in with nothing to prevent it from jamming or falling out (clevis pin & clip from the donor alongside) -

After a bit of grinding and cussing the lump gave up the fight -

With the engine bay empty the extent of bodges revealed -


Where the cab floor has been cut out then stuck back in AFTER the engine was fitted -


That's it for a few days while I get kit on site to chop out the trash & then fettle sections from the donor to weld into place.
A big relief to have only CF stuff to work with now. Margrae, get your paintbrush out...
----------------------
|
Sun 17 Jan 2010 @ 23:28
| |
Anon
Deleted
Posts :
Location :
Status : Offline
|
Hi
What a bloody mess......thats putting it mildly !! An accident waiting to happen. I am lost for words......just trying to understand why someone would do that. If I could get my hands on the guy that sold me the van....telling me it had an 'updated engine' fitted....fantastic. Well you live and learn I guess, maybe will make some other members feel better about their vans though.
Better get the paint and brushes ready !!...sounds like putting a sticking plaster on a severed limb !
A big thankyou to van whisperer Phil though...he must be exhausted !!
Margaret
----------------------
|
Sun 17 Jan 2010 @ 23:56
| |
Anon
Deleted
Posts :
Location :
Status : Offline
|
Phil has all his ski suit and ford overall nice and clean for the next phase...Had to wash all the contamination from the alien engine as now its the beddie parts to fit
----------------------
|
Mon 18 Jan 2010 @ 00:02
| |
Anon
Deleted
Posts :
Location :
Status : Offline
|
All ready for Phil
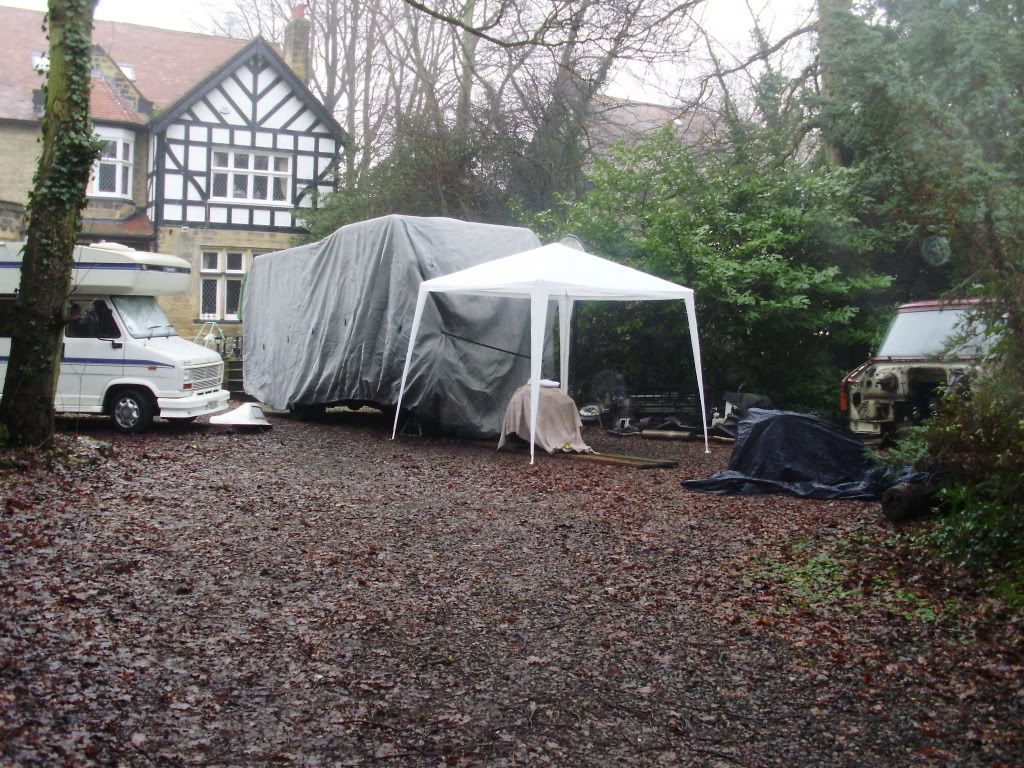
My garden looks like a scrapyard!!!!!
----------------------
|
Tue 19 Jan 2010 @ 19:10
| |
Anon
Deleted
Posts :
Location :
Status : Offline
|
Looks like a crime scene !!
Margaret
----------------------
|
Tue 19 Jan 2010 @ 19:37
| |
Anon
Deleted
Posts :
Location :
Status : Offline
|
:o
----------------------
|
Wed 20 Jan 2010 @ 07:26
| |
Anon
Deleted
Posts :
Location :
Status : Offline
|
Day 5 - tin bashing cutting plan
Bodged floor repair on the passenger side took few wallops to break it out but by the time the pedals bracket was out of the way it was time to pack up for the day so the mess on the driver's side is still in place. Got an idea of where to cut though -

What it should look like (donor cab stripped out) -

Driver's side -

and what it should look like -

There's a bit to do on the donor yet to remove the pedal bracket but that doesn't take much.
----------------------
|
Wed 20 Jan 2010 @ 20:46
| |
Anon
Deleted
Posts :
Location :
Status : Offline
|
Day 6 - much banging & grinding...
Slowest part of the job now.
Centre floor panel from Margrae's van carved out by popping the spot welded edges each side, detached at the front by popping the spot welded edges & then cutting at the front of the cross member behind the brace at the back of the engine aperture -

The brace has been well chewed & pieced up by previous bodges & the front edge of the cross member has been hacked about too. Snot welding is of the blobby school variety...
Before doing anything with the cross member the donor had similar treatment but cut larger on the width by cutting along the edge of the chassis longitudinals & longer by keeping the cross member & brace attached by cutting to the rear of the cross member back edge -

Once the assembly was out the edge of the panel needed cleaning up to lap onto to the edges left intact on Margrae's van -

From right to left: edge strip to be removed still in place between cross member & brace; strip removed & remains of spot welds ground off; edge finished using an 80 grit flap wheel (less aggressive than a grinding wheel - lap edge thickness doesn't want thinning down any).
Cleaning up the panel edges takes forever to avoid tearing & distortion; probably will be another day of banging & grinding before the panel assembly can be fitted. Then everything attached to the chassis longitudinals has to be removed so that the panel can be manoeuvred into place from the front.
----------------------
|
Thu 21 Jan 2010 @ 20:23
| |
Anon
Deleted
Posts :
Location :
Status : Offline
|
Days 7, 8, 9...
First fit of the replacement floor assembly -


The assembly was fitted through the front of the van & levered into place after the original floor edges were bent down & assembly edges bent up so that the assembly cross member & front brace could be positioned between the chassis longitudinal members.
The raised edge of the original rear floor edge was left way too wide but until the assembly was fitted it would have been a bit rash to trim it & risk not landing the welding over the rear spot-welded edge of the cross member.
Once the rear floor edge was trimmed & bashed down a bit the seat bases from the donor along with the engine cowl (cover) were used to position the assembly correctly -


First tack welds were above the brace in front of the gear lever aperture & then the brace was pressed up against the underneath using a small bottle jack for welding the ends there. Once this was done the seat bases came out again.
Next tack welds were around the rear corner overlaps -

The stud for the welding earth clamp (a 5/16" UNF bolt & nut in a seat base threaded hole) was to make the current path as short as possible because the arc kept refusing to strike ... but when the fuse blew in the extension lead plug a new fuse fixed the problem!
Once the top of each corner was tacked down the end of the cross member was pressed up against the lip of the chassis longitudinal for welding there & then the vertical lips of the box section were seam welded to the sides of the longitudinal.
Once both rear corners were solid all but the front 8 inches of the sides were then tacked down; much bending & bashing & clamping & cussing (oh for separate panels to just fit & weld!) and best part of a rainy day and half the next to get it right.
Once that was all done though it was a case of just run round with seam welding -


- until I ran out of wire anyway; one thing I didn't think to have lots of to hand. Can't complain though because the worst part of the job is almost finished.
----------------------
|
Sun 24 Jan 2010 @ 22:49
| |
Anon
Deleted
Posts :
Location :
Status : Offline
|
once again 
----------------------
|
Mon 25 Jan 2010 @ 07:19
| |
Anon
Deleted
Posts :
Location :
Status : Offline
|
Pics by Phil's apprentice The one that had too many coffee and fag breaks ! not to mention an injury to pinkie.....ouch ! blood and skin loss !!
The Perkins 4.154 cleaned up....got soaked and a dirty face in the process !!


Phil welding and grinding !!


Rear view

----------------------
|
Mon 25 Jan 2010 @ 21:55
| |
Anon
Deleted
Posts :
Location :
Status : Offline
|
I have only just read this thread, and good lord , Who was responsable for that mess. I am very much in to fitting things to cars that are not supposed to be there but only if I can get it in there safely...
There is some cracking work goin on there Phil and some good info on the front floor structure too, some of which I will be putting to good use soon when I swap the motor in mine. 
----------------------
|
Tue 26 Jan 2010 @ 12:57
| |
Anon
Deleted
Posts :
Location :
Status : Offline
|
Mister E wrote:
I have only just read this thread, and good lord , Who was responsable for that mess.
There seems to be 2 lots of floor welding, both gash enough to bang out pretty quickly, along with 2 lots of welding around the Frontera supports posts on the front on the chassis longitudinal members with some nice stick welding on what looked like additional braces added afterwards. Once the stick welding was cut through the posts banged off...
There were the remains of other mounting posts further forwards too, possibly for a previous Transit engine if the history of the van is reliable.
I am very much in to fitting things to cars that are not supposed to be there but only if I can get it in there safely...
You & me both!
There is some cracking work goin on there Phil and some good info on the front floor structure too, some of which I will be putting to good use soon when I swap the motor in mine.
Thanks. It's been a bit slow getting it right enough to last & I'm not too happy about some of the weld runs where they've got a lot of surface build - the conditions are a bit damp & horrible & the welding mask steaming up didn't help - but I've managed to get fairly even penetration through to what's underneath so there's room to grind off the worst of the lumps.
----------------------
|
Tue 26 Jan 2010 @ 14:27
| |
Anon
Deleted
Posts :
Location :
Status : Offline
|
Day 10, floor left side front
Section cut out from the donor in one piece well over-size & trimmed down to span where it's to go with ~1 inch overlap along weld edges -


The section was separated along the spot welded edge between floor panel & upright channel edge keeping a piece of the bulkhead about 1 inch wide intact for lap welding.
Floor panel positioned, engine cover used to locate peg in relation to the rest of the floor -


Floor plate tacked down then upright channel fitted, again using the engine cover to ensure that the toggle clip fitted when the cover sat properly on the 2 pegs now fitted -


Underfloor -

Brace is welded to the floor panel & chassis longitudinal lip, cross member likewise & also along the vertical lips to front & rear of the section to the side of the chassis longitudinal.
Back home for a couple of nights before finishing with welding & making a start on reducing the piles of bits spread about the place.
----------------------
|
Tue 26 Jan 2010 @ 14:54
| |
|
Time in GMT
|

 New posts since your last visit
 Old post